Want to import 4K footage into Premiere Pro CC/CS6 for making some modifications? If so, you won't miss this post with best workflow of working 4K clips.As 4K-resolution cameras falling into consumers' hands, such as BlackMagic Design Production Camera, Leica D-LUX, Panasonic LUMIX DMC-GH4K/FZ1000, Sony Alpha a7S, GoPro Hero4 Black, Canon EOS 1D-C, etc. In this situation, if you recorded some 4K videos with your 4K camcorder, you may prefer to edit them before sharing with friends or uploading to YouTube or 4K TV. Then the question arises. Will editing programs like Premiere Pro CC support 4K videos? Granted, Premiere Pro CC 7 (2017 included), CS6 can handle (usually) 4K files without much problem, but it is extremely hardware intensive. You probably don't like to invest a new computer, that means dead end? Humh, of course not, but you do need to transcode 4K video to Premiere Pro using MPEG-2 (1080p) as primary delivery format. Here we will discuss how to edit 4K footage with Premiere Pro without bogging down your computer. How to import and edit 4K video in Premerie Pro CC successfully?To get a best solution for 4K video and finish the 4K video conversion task, the best Mac 4K video converter app,Dimo Video Converter Ultimate for Mac, is your best choice to transcode DJI, Nikon, Sony, Blackmagic, GoPro, Panasonic, Canon 4K video to Premerie Pro CC codec. With it, you can effortlessly transcode transcode 4K video, H.264(MP4), XAVC, XAVC S, etc footage to MPEG-2 for Premiere Pro. What's more, it supports converting 4K files to various non-linear editing systems (NLE), including Avid Media Composer, Final Cut Pro, Camtasia Studio and more. If you work 4K files in Adobe Premiere Pro on Windows PC, please get Dimo Video Converter Ultimate to solve the issues.Free Download Dimo Video Converter Ultimate for Mac/Win:
 Other Download:
Convert 4K video files for Adobe Premiere Pro CS6/CC/CS6/CS5/CS4Step 1. Load 4K FilesRun the program you just install, and drag and drop the 4K video files to the 4K converter. You can also hit "Add File" button to import videos to the app. Step 2. Choose output format Click "Select Format" bar and choose "Format" > "Editor" > "Adobe Premiere" as output format for editing 4K in Adobe with natively supported video codec.
Other Download:
Convert 4K video files for Adobe Premiere Pro CS6/CC/CS6/CS5/CS4Step 1. Load 4K FilesRun the program you just install, and drag and drop the 4K video files to the 4K converter. You can also hit "Add File" button to import videos to the app. Step 2. Choose output format Click "Select Format" bar and choose "Format" > "Editor" > "Adobe Premiere" as output format for editing 4K in Adobe with natively supported video codec. Tips: Click "Setting" button if you'd like to customize advanced audio and video parameters like Video Codec, aspect ratio, bit rate, frame rate, Audio codec, sample rate, audio channels. However, please keep it default as original if you want to get original 4K resolution.Step 3. Start converting 4K filesTab the "Start" button of this fastest 4K Video Converter. It will start to transcode 4K for importing to Adobe Premiere Pro immediately. Soon after the conversion, just click "Open" button to get the generated files for natively editing in Premiere Pro CC 2017 as well as CC7/CS6/CS5/CS4/CS3 perfectly.Other tips to get best Premiere Pro CC Settings:1. Disable High-Quality Playback, gets you apx. 5-10% performance (Player Window/Wrench Icon/High Qaulity Playback).INFO: Mercury Engine Transmit to second monitor, takes away apx. 5-10% performance (Player Window/Wrench Icon/Enable Transmit).2. RedCode/Cineform movie files: Set playback resolution to 1/2 or 1/4 size will increase performace apx. 10-20% (Player Window/Full-1/2-1/4,etc.)3. Increase Playback Preroll and Postroll time to 3-8 seconds for smoother playback, especially with slower harddrives (Edit/Preferences/Playback/Preroll-Postroll).4. Disable Lumetri Scopes if not needed. They have been optimized in PP 2015.3 but you loose 3-8% performance when enabled (Window/Lumetri Scopes).Free Download or Purchase Dimo Video Converter Ultimate for Mac:
 Contact us or leave a message at Facebook if you have any issues of importing 4K to Premiere Pro CC.More Articles:
Source: Downsacle and Convert 4K to edit in Adobe Premiere Pro CC/CS6
Contact us or leave a message at Facebook if you have any issues of importing 4K to Premiere Pro CC.More Articles:
Source: Downsacle and Convert 4K to edit in Adobe Premiere Pro CC/CS6
With Panasonic, the longest-standing television manufacturers that has been at the forefront of TV design for many years, and its impressive television models, including plasma, Viera TV, LED, LCD, OLED, and 4K TVs, you can enjoy all kind of media files on Panasonic television. However, when you tried to add some kinds of MP4 videos to Panasonic TV for enjoyment via USB flash drive, you may fail to do the job. So, what's the problem? How to solve "Panasonic TV not playing MP4" issue? Read on detailed solutions.  Why Panasonic TV won't play MP4 files? To play all kinds of MP4 on Panasonic TV, you need to choose corresponding preferred codec for your TV model. From Panasonic TV official website we know that Panasonic TV is only compatible with MP4 in H.264/MPEG-4 AVC video codec and AAC audio codec. However, MP4 is a container format which contains various kinds of video and audio codecs. Once the MP4 files can't meet the requirement of Panasonic TV input format and codec, you'll get into trouble to play MP4 in Panasonic TV. Besides this, there are some other possible reasons: * The damaged MP4 Video content will not play correctly on Panasonic TV* When you play MP4 video on Panasonic TV over a network connection, the video may not be played smoothly. * If the Index Table is in error, the Seek (Jump) function is not supported. Best Workaround to Solve Panasonic TV Won't Play MP4 There is no better way to watch MP4 on Panasonic TV than to convert MP4 to Panasonic TV compatible formats like MP4 and MKV. Thankfully, there are quite a lot of web-based video converter applications available specifically for people to convert media files. It's recommended to use Dimo Video Converter Ultimate to do conversion. It is ensured that this tool will enable you to:
- Convert all kinds of video and audio types including 2D/3D MP4, SD/HD/4K MP4, H.264/H.265 MP4, AVI, MKV, FLV, MPG/MPEG, WMV, MOV, FLAC, WMA, etc.
- World's fastest speed to convert MP4 to Panasonic TV, thanks to the NVIDIA CUDA hardware acceleration tech
- Directly accomplish MP4 to Panasonic TV conversion preset profiles for TV
- Trim, crop, rotate videos, add effect/watermark, create 3D to meet your needs.
- Adjust the parameters of video and audio files.
- Free share videos from computer in common formats to mobile devices or TV wirelessly
- Perfectly compatible with Windows PC, no matter the latest Windows 10, 8.1 or earlier ones
If you're a Mac user, simply turn to Dimo Video Converter Ultimate for Mac, which has the same function as the Windows version. Now download the program according to your computer system and follow the simple guide below to get incompatible MP4 files to play on Panasonic TV nicely. Free Download Dimo Video Converter Ultimate (Win/Mac):
 Other Download:
Guide: Convert and play MP4 video on Panasonic TV Step 1: Add MP4 files Install and launch the MP4 file converter, and then click "Add File" button to import your .mp4 to the software one by one.
Other Download:
Guide: Convert and play MP4 video on Panasonic TV Step 1: Add MP4 files Install and launch the MP4 file converter, and then click "Add File" button to import your .mp4 to the software one by one. Step 2: Set output video format Click "Select Format" bar and select "Device > TVS > Panasonic TV" video as target format. The optimized output format will contains the best video settings for playback on your anasonic TV. Tip: This top MP4 to Panasonic TV Converter enables you to modify the output parameters. You can click the Settings icon and adjust the video bitrate, codec, frame rate, audio sample rate, etc parameters. Step 3: Start MP4 to Panasonic TV conversion Hit the "Start" button; this video converter will start to convert MP4 to Panasonic TV for playback. After the conversion, click "Open" in the main interface to locate the output videos.Then it would be easy to transfer and play MP4 files on Panasonic TV via USB, DLNA, WLAN or Dimo Media Server below.
 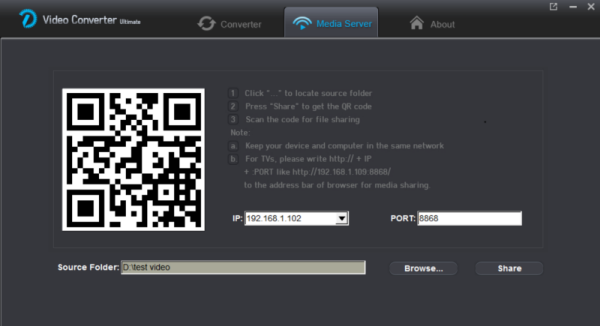 1- Network connection: Make sure that the PC/Mac and Panasonic TV are connected to the same home Wi-Fi. 2- Open Dimo Video Converter Ultimate and click "Media Server" tab. 3- Click on "Browse" button to choose the location which store your source movies. 4- Click "Share" to begin sharing local videos to Panasonic TV. Don't close the free Media Server for Dimo. 5- Open the browser on Panasonic TV and input the website URL "http://IP:PORT" like "http://192.168.1.109:8868/" (without quotation marks) into the address bar. 6- The loaded video source will be listed and you can now play converted MP4 movies on your Panasonic TV. The Panasonic TV MP4 support issue has been excellently solved. Then just enjoy your life in front of the home theater.Free Download or Purchase Dimo Video Converter Ultimate:
 Need the lifetime version to work on 2-4 PCs so that your friends and family can instantly broaden their entertainment options? Please refer to the family license here.
  Kindly Note:The price of Dimo Video Converter Ultimate for Windows is divided into 1 Year Subscription, Lifetime/Family/Business License: $43.95/Year; $45.95/lifetime license; $95.95/family license(2-4 PCs); $189.95/business pack(5-8 PCs). Get your needed one at purchase page.Contact us or leave a message at Facebook if you have any issues.Related Articles:
Source: Won't play MP4 on Panasonic TV? Solved
Kindly Note:The price of Dimo Video Converter Ultimate for Windows is divided into 1 Year Subscription, Lifetime/Family/Business License: $43.95/Year; $45.95/lifetime license; $95.95/family license(2-4 PCs); $189.95/business pack(5-8 PCs). Get your needed one at purchase page.Contact us or leave a message at Facebook if you have any issues.Related Articles:
Source: Won't play MP4 on Panasonic TV? Solved
Roughly seven months after the EOS-1D X Mark II's introduction, the 5D Mark IV became Canon's third DSLR to feature 4K video recording and their second full frame camera with a Dual Pixel CMOS sensor. Higher resolution video recording (like 4K) makes accurate, smooth focusing more important than ever. If you record some 4K videos from Canon 5D Mark IV, things would be a little more complicated when you work with the 4K files in Final Cut Pro. 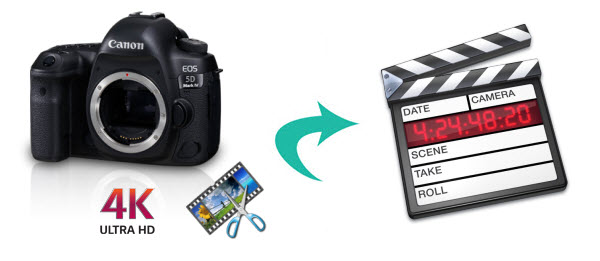 From Apple official site, we know that FCP X can support editing and monitoring 4K video, including 4K ProRes, Sony XAVC and REDCODE RAW from version 10.1. But the point here is, Final Cut Pro 7 still uses 1080p as primary delivery format and will continue to do so for a long time. Besides, you should make sure your Mac meet the mini requirements to edit 4K video, if not, it would be much ideal for you to create a proxy file format with smaller file resolution for editing with Final Cut Pro X. Thus, to import and edit Canon 5D Mark IV 4K clips in FCP 7/X smoothly, you are advised to convert and downscale 4K to 1080p from 5D Mark IV for Final Cut Pro before editing. That's why I vote for Dimo Video Converter Ultimate for Mac, an effective and efficient 4K to FCP Converter. Without rendering time, the program can utilize all cores to achieve 6X faster conversion speed. Thanks to the advanced video/audio encoding technology, this Canon 5D Mark IV video converter also makes sure that the quality is preserved and the user gets the same view as well as the results when it comes to the conversion.Plus, a highlight is that the program supports various video codec for editors/players/servers/devices/online websites. With it, you can effortlessly encode/re-encode Canon 5D Mark IV 4K footage for smoothly importing and editing in various non-linear editing systems (NLE), including Final Cut Pro, Adobe Premiere Pro, Avid Media Composeror playing on QuickTime, iTunes, Windows Media Player, VLC, 4K Smart TV, Tablet, Smartphone, PS4 Pro, PS3, Xbox One S, Wii, WDTV, Roku, etc., even sharing to Youtube, Vimeo, Facebook, etc. Windows version is here.More than dealing with 5D MK 4 recordings, you can also use it to handle H.264 MOV footage shot by Canon EOS 5D Mark III/Mark II, 550D(Rebel T2i), Canon EOS 650D(Rebel T4i), EOS 700D(Rebel T5i) and more. Download the top 4K video converter on Mac and follow the tutorial. Free Download Dimo Video Converter Ultimate for Mac/Win: Other Download:
How to Convert Canon 5D Mark IV video files to work in FCPStep 1: Load the 4K videos to the program Install and run the 4K Video Converter, and then import the source 4K videos to it. To do so, you can directly drag & drop the files onto the main interface, or you can click the "Add File" icon to locate the videos from your local disk.
From Apple official site, we know that FCP X can support editing and monitoring 4K video, including 4K ProRes, Sony XAVC and REDCODE RAW from version 10.1. But the point here is, Final Cut Pro 7 still uses 1080p as primary delivery format and will continue to do so for a long time. Besides, you should make sure your Mac meet the mini requirements to edit 4K video, if not, it would be much ideal for you to create a proxy file format with smaller file resolution for editing with Final Cut Pro X. Thus, to import and edit Canon 5D Mark IV 4K clips in FCP 7/X smoothly, you are advised to convert and downscale 4K to 1080p from 5D Mark IV for Final Cut Pro before editing. That's why I vote for Dimo Video Converter Ultimate for Mac, an effective and efficient 4K to FCP Converter. Without rendering time, the program can utilize all cores to achieve 6X faster conversion speed. Thanks to the advanced video/audio encoding technology, this Canon 5D Mark IV video converter also makes sure that the quality is preserved and the user gets the same view as well as the results when it comes to the conversion.Plus, a highlight is that the program supports various video codec for editors/players/servers/devices/online websites. With it, you can effortlessly encode/re-encode Canon 5D Mark IV 4K footage for smoothly importing and editing in various non-linear editing systems (NLE), including Final Cut Pro, Adobe Premiere Pro, Avid Media Composeror playing on QuickTime, iTunes, Windows Media Player, VLC, 4K Smart TV, Tablet, Smartphone, PS4 Pro, PS3, Xbox One S, Wii, WDTV, Roku, etc., even sharing to Youtube, Vimeo, Facebook, etc. Windows version is here.More than dealing with 5D MK 4 recordings, you can also use it to handle H.264 MOV footage shot by Canon EOS 5D Mark III/Mark II, 550D(Rebel T2i), Canon EOS 650D(Rebel T4i), EOS 700D(Rebel T5i) and more. Download the top 4K video converter on Mac and follow the tutorial. Free Download Dimo Video Converter Ultimate for Mac/Win: Other Download:
How to Convert Canon 5D Mark IV video files to work in FCPStep 1: Load the 4K videos to the program Install and run the 4K Video Converter, and then import the source 4K videos to it. To do so, you can directly drag & drop the files onto the main interface, or you can click the "Add File" icon to locate the videos from your local disk. 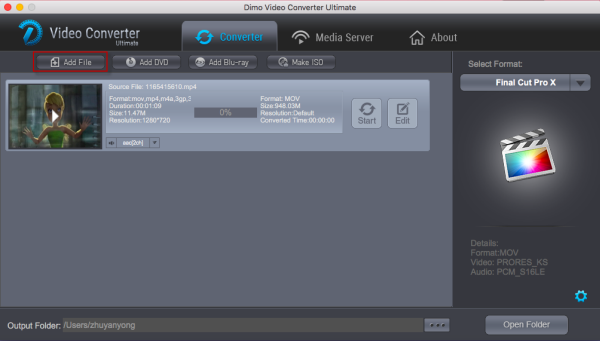 Step 2: Set output video format Click the "Select Format" bar and select "Format > Editor > Final Cut Pro 7 or Final Cut Pro X" as output format. Tip: Click the "Settings" button and customize proper video/audio parameters including Video size, bitrate and fame rate and more. Usually 1920*1080 video size and 30fps video frame rate are recommended for FCP 7/X editing. Besides, in order to split videos beyond the size limitation while uploading to website, please click the "Edit > Trim" button
 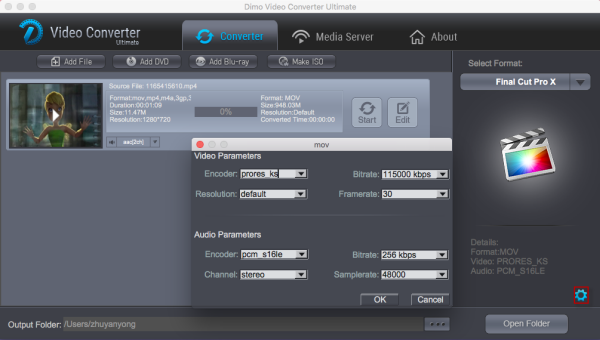 Step 3: Begin to convert Canon 5D Mark IV 4K videos When you finish the settings, you can press the big "Start" button to kick off the 4K to Prores conversion. By using this professional 4K to FCP Converter, the conversion will be finished with ultrafast speed and the best video quality kept. After the conversion, you can then edit Canon 5D Mark IV raw 4K in Final Cut Pro 7/X smoothly. After editing, you can freely share edited videos on mobile devices or online websites like YouTube.Free Download or Purchase Dimo Video Converter Ultimate for Mac/Win:
 Need the lifetime version to work on 2-4 Macs so that your friends and family can instantly broaden their entertainment options? Please refer to the family license here. Kindly Note:The price of Dimo Video Converter Ultimate for Mac is divided into 1 Year Subscription, Lifetime/Family/Business License: $43.95/Year; $45.95/lifetime license; $95.95/family license(2-4 Macs); $189.95/business pack(5-8 Macs). Get your needed one at purchase page.Contact us or leave a message at Facebook if you have any issues.Related Articles:
Source: Import Canon 5D Mark IV 4K files to FCP 7/X without rendering
Need the lifetime version to work on 2-4 Macs so that your friends and family can instantly broaden their entertainment options? Please refer to the family license here. Kindly Note:The price of Dimo Video Converter Ultimate for Mac is divided into 1 Year Subscription, Lifetime/Family/Business License: $43.95/Year; $45.95/lifetime license; $95.95/family license(2-4 Macs); $189.95/business pack(5-8 Macs). Get your needed one at purchase page.Contact us or leave a message at Facebook if you have any issues.Related Articles:
Source: Import Canon 5D Mark IV 4K files to FCP 7/X without rendering
If you want a more smooth playback on H.265 encoded video in Kodi, you’d better transcode H.265 to H.264 video.Kodi has become one of the most popular ways to watch TV and movies. With the growth of smaller PCs, on-demand streaming and downloadable content, it has never been simpler to bring your favourite flicks into your living room, and Kodi is possibly the best way to do it. Got some new files in H.265 codec and wanna add them on your Kodi (originally known as XBMC - or 'Xbox Media Center')? However, it seems a bit complicated as Kodi won't open 4K H.265 as expected.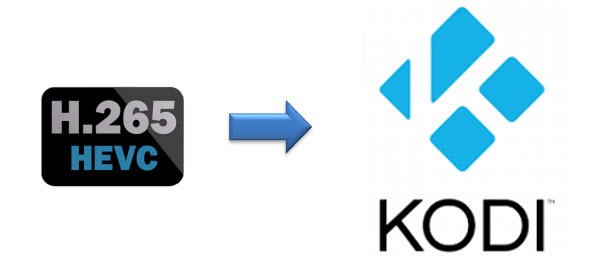 Q1: H.265 video play terrible on kodi on ts451AI have some H.265 video, I played them on kodi 16 & 17,but the frame droped terrible and video and voice didn't sync. I checked the cpu ocupy is 100%. I want to know if the ts451's cpu not strong enough or the kodi is not work proper for H.265. It's seem's that the hardware accelerate didn't work.Q2: Android Box with h.265 hardware encoding issueI have an android box right now that I purchased back in 2015 which works ok for my h.264 videos off of my nas. Putting together my archive has been great but my drive is starting to fill up so I have started converting the videos over to h.265 for Kodi and the results are good. I figure I will have at minimum 40% more space once they are converted.
Unfortunately my older Android Box doesn't decode the h.265 videos very well or good at all. I have been looking at newer generic boxes that support h.265 decoding some of them also have more memory and storage which should be good. However picking the correct CPU/GPU setup is difficult. I hope someone can give me some real world suggestions. Thanks a lot.Q3: Looking for a streaming bo supports H265As the title suggests I'm looking for a replacement for my trusted WDTV. Been using it for years now. Very reliable. But with the H.265 and new stuff coming out need to upgrade.
I'm looking for a simple box that supports h265 and h264 and other video codecs as well as audio codecs like Dolby AAX and dts. Just wanna play my tv shows and movies that I download. Streaming from Kodi would be a big plus. Q4: Kodi stutters (badly) when playing HEVC content Kodi stutters unbearably when playing any HEVC content. All drivers on my system are up to date, and Kodi is set to run with the Nvidia GPU (optimus system). I can also confirm that hardware-acelerated decode is both enabled (in Kodi) and is working with HEVC (using DXVA Checker's trace mode). Is there any other way to see what the problem might be? The stutter is so bad, Kodi hangs up momentarily and then resumes playback choppily up to a point, then resumes again.Isn't it possible to play 4K H.265 on Kodi? Yes, Kodi (version 14 onwards) offers decoding support for HEVC. (Refer to Kodi HEVC support here) However, lag, out of sync and drop frames issues still exist when playing. Worse still, if your streaming box or devices support HEVC hardware decoding, or have too low power SoCs to support smooth software playback, you will still fail to copy H.265 videos to Kodi for watching.See the below limitations:1. The Intel Celeron N3060 (Braswell) has limited GPU decoding support of x256 http://ark.intel.com/products/91 ... ache-up-to-2_48-GHz2. Only 8bit and not 10bit are supportedhttps://communities.intel.com/thread/59216?tstart=03. Streaming Boxes and Console SupportHere's a quick rundown of popular media playing devices that don't support HEVC:
- Google's Chromecast (first and second generations)
- Apple TV (although some reports suggest 1080p HEVC playback is possible by running VLC on a 4th-gen model)
- Roku (third-gen models and earlier)
- Amazon Fire TV (2014) and Fire TV Stick
- Any Western Digital WD TV products
- All PlayStation consoles (including PS4 Pro)
- Xbox 360
And here are the media players that do support HEVC:
- Roku 4
- Amazon Fire TV (2015) and 2nd-gen Fire TV Stick
- Xbox One
In this situations, to add and view H.265 files on Kodi, the easy workaround is convert H.265 to a more common video format like MP4, MKV, AVI, MPG, etc.. Actually, it is not so hard as you image. What you need is just a common video converter like Dimo Video Converter Ultimate is a great H.265 tool to help you out. It features a simple yet sleek interface and performs files conversion with fast speed enables you to complete the H.265 to Kodi supported H.264 codec task with least quality loss in just a few clicks at your fingertips. Apart from that, its built-in editor can help users to do some basic editing work before conversion, like trimming, cutting, adding effect/watermark etc. What's more, it also offers the optimal profiles for iPhone, iPad, iPod, Apple TV,TV, PS4 Pro, Xbox One S and more. For Mac users, please get Dimo Video Converter Ultimate for Mac to have a try. Download it from below and read further to know how to successfully convert your H.265 video files into Kodi supported H.264 within clicks. Free Download Dimo Video Converter Ultimate (Win/Mac): Other Download:
How to convert H.265 video to Kodi format1. > Install and run the best H.265 converter for Kodi and transfer your ripped, downloaded H.265 movies or video recordings like from Samsung NX1/NX500, DJI Inspire 2 to the program.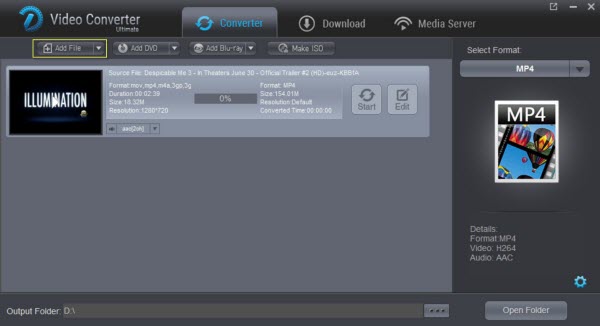 2. > Click "Select Format" bar and choose H.264 MP4 or MKV from "Format > Video" or "Format > HD Video" as the output format.What are the file formats supported by Kodi Container formats: AVI, MPEG, WMV, ASF, FLV, MKV/MKA (Matroska), QuickTime, MP4, M4A, AAC, Ogg, OGM, RealMedia RAM/RM/RV/RA/RMVB, 3gp Video formats: MPEG-1, MPEG-2, H.263, MPEG-4 SP and ASP, MPEG-4 AVC (H.264), H.265 (as from Kodi 14) HuffYUV, MJPEG, RealVideo, RMVB, WMV Audio formats: MIDI, AIFF, WAV/WAVE, AIFF, MP2, MP3, AAC, DTS, ALAC, AMR, FLAC, RealAudio, WMA 3D video formats: Passive 3D video formats such as SBS, TAB, anaglyph or interlacedTip: Click the Settings icon to adjust video and audio parameters, like audio & video bitrate, video size, channel as you need.
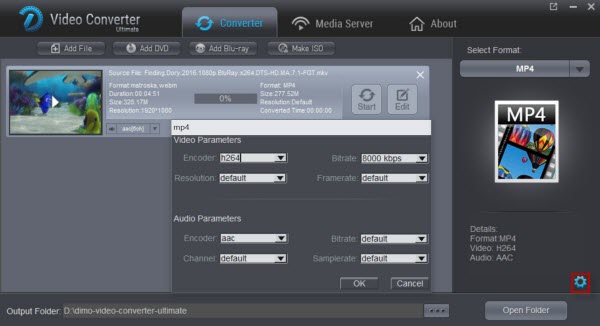 3. Click the "Start" icon after all settings, and the H.265 Video Converter will start transcoding H.265 to Kodi preferred format immediately. After the conversion, get the output files by clicking the Open button. After that, you can copy, stream or transfer the converted Blu-ray videos to XBMC for smooth playback at ease without any problem.If your files are MKV, VOB, H.265, FLV, XAVC, MOV, WMV, Tivo recording files, camera files like MXF, MTS, or Blu-ray, DVD disc format, Dimo Video Converter Ultimate can also be the best partner with your Kodi. It can help you convertDVD, Blu-ray and SD/HD/4K videos to Kodi friendly video with the best quality to expand your movie enjoyment. What’s more, this all-in-one video converter allows you to tweak the video size, bitrate, frame rate, audio codec, etc to get a decent video as you want. Free Download or Purchase Dimo Video Converter Ultimate: Need the lifetime version to work on 2-4 PCs so that your friends and family can instantly broaden their entertainment options? Please refer to the family license here. Kindly Note:The price of Dimo Video Converter Ultimate for Windows is divided into 1 Year Subscription, Lifetime/Family/Business License: $43.95/Year; $45.95/lifetime license; $95.95/family license(2-4 PCs); $189.95/business pack(5-8 PCs). Get your needed one at purchase page.Related Software:BDmate (Win/Mac)Lossless backup Blu-ray to MKV with all audio and subtitle tracks; Rip Blu-ray to multi-track MP4; ConvertBlu-ray to almost all popular video/audio formats and devices; Copy Blu-ray to ISO/M2TS; Share digitized Blu-ray wirelessly.DVDmate (Win/Mac)A professional DVD ripping and editing tool with strong ability to remove DVD protection, transcode DVD to any video and audio format, and edit DVD to create personal movie.Videomate (Win/Mac)An all-around video converter software program that enables you to convert various video and audio files to formats that are supported by most multimedia devices.8K Player (Win/Mac)A mixture of free HD/4K video player, music player, Blu-ray/DVD player, video recorder and gif maker. Contact us or leave a message at Facebook if you have any issues.Related Articles:
Source: How to add H.265 to Kodi for playback
3. Click the "Start" icon after all settings, and the H.265 Video Converter will start transcoding H.265 to Kodi preferred format immediately. After the conversion, get the output files by clicking the Open button. After that, you can copy, stream or transfer the converted Blu-ray videos to XBMC for smooth playback at ease without any problem.If your files are MKV, VOB, H.265, FLV, XAVC, MOV, WMV, Tivo recording files, camera files like MXF, MTS, or Blu-ray, DVD disc format, Dimo Video Converter Ultimate can also be the best partner with your Kodi. It can help you convertDVD, Blu-ray and SD/HD/4K videos to Kodi friendly video with the best quality to expand your movie enjoyment. What’s more, this all-in-one video converter allows you to tweak the video size, bitrate, frame rate, audio codec, etc to get a decent video as you want. Free Download or Purchase Dimo Video Converter Ultimate: Need the lifetime version to work on 2-4 PCs so that your friends and family can instantly broaden their entertainment options? Please refer to the family license here. Kindly Note:The price of Dimo Video Converter Ultimate for Windows is divided into 1 Year Subscription, Lifetime/Family/Business License: $43.95/Year; $45.95/lifetime license; $95.95/family license(2-4 PCs); $189.95/business pack(5-8 PCs). Get your needed one at purchase page.Related Software:BDmate (Win/Mac)Lossless backup Blu-ray to MKV with all audio and subtitle tracks; Rip Blu-ray to multi-track MP4; ConvertBlu-ray to almost all popular video/audio formats and devices; Copy Blu-ray to ISO/M2TS; Share digitized Blu-ray wirelessly.DVDmate (Win/Mac)A professional DVD ripping and editing tool with strong ability to remove DVD protection, transcode DVD to any video and audio format, and edit DVD to create personal movie.Videomate (Win/Mac)An all-around video converter software program that enables you to convert various video and audio files to formats that are supported by most multimedia devices.8K Player (Win/Mac)A mixture of free HD/4K video player, music player, Blu-ray/DVD player, video recorder and gif maker. Contact us or leave a message at Facebook if you have any issues.Related Articles:
Source: How to add H.265 to Kodi for playback